Music: I love pop music and I love Scandinavian music and most of all, I love Scandinavian pop music, but I think my taste for music is transition into electronic once again. It changes so often. Let's see where this goes.
Showing posts with label food. Show all posts
Showing posts with label food. Show all posts
Sunday, January 16, 2011
Tastes: Food + Music
Food: I think I've successfully transitioned back to carnivore land. I eat meat actually pretty regularly since I went home for the holidays. My mom's turkey/ham/etc. opened up a pandora's box for me. I called this early period "flexitarian" but I think it's full-fledge meat-eating now. Although it's usually at restaurants that I do this. At home, I still prefer veg options.
Sunday, August 16, 2009
Lahat ng Tungkol sa Aking Ina
Shoutout to my mother who reads my blog every now and then.
Busy life means an inability to keep in contact with everyone living a distance greater than 100 miles away. Its awful.
Anyways, it was very nice talking to her and letting her know what's up with my life. But she'd basically pieced together bits and pieces of it through her expert internet researching abilities. Even though she reads up on me, we're still not facebook friends. That's just far too intimate.
Been blogging more in my free-time. Hmm... oh, that's right, because now that summer school is over and The Daily Texan has wrapped up until the start of the fall semester, I've got a little bit of time on my hands. Magnifique. Unfortunately, I've pretty much given up on blogging strictly about food. It's such a process.
Not much else going on. Gonna have to start making this ratatouille soon. My vegetables are getting kinda old now. I don't know how to make a classic ratatouille at all, but I'm just gonna... well... make my own version of it.
I wonder if she cares that I'm posting up her [facebook profile] picture?
 This is my mother, whom I adore.
Busy life means an inability to keep in contact with everyone living a distance greater than 100 miles away. Its awful.
Anyways, it was very nice talking to her and letting her know what's up with my life. But she'd basically pieced together bits and pieces of it through her expert internet researching abilities. Even though she reads up on me, we're still not facebook friends. That's just far too intimate.
Been blogging more in my free-time. Hmm... oh, that's right, because now that summer school is over and The Daily Texan has wrapped up until the start of the fall semester, I've got a little bit of time on my hands. Magnifique. Unfortunately, I've pretty much given up on blogging strictly about food. It's such a process.
Not much else going on. Gonna have to start making this ratatouille soon. My vegetables are getting kinda old now. I don't know how to make a classic ratatouille at all, but I'm just gonna... well... make my own version of it.
I wonder if she cares that I'm posting up her [facebook profile] picture?
This is my mother, whom I adore.
Wednesday, July 15, 2009
Tilapia over Orzo
Wanted Salmon. Too expensive. Went for a cheaper alternative, felt like Sandra Lee. Anyways. I seared the tilapia first, then poured a melted butter/lemon juice/lemon zest mixture over them in a flat kinda casserole dish. Some garlic, some rosemary, some sauteed onions. Baked the fish in the juices and herbs topped with two thin slices of lemon (more acid!). It was delicious. Every time I bit into an onion, it was a burst of citrusy, acidic, tart flavor.
This was actually the first time I had orzo. I really liked it as a much easier to cook version of rice. Much lower maintenance. I just mixed the orzo with olive oil, some rosemary, some Parmesan and some Gruyere (my favorite cheese!). It was pretty mild compared to the strong flavors I cooked with the fish but it was a nice compliment.

Anyways, nothing too fancy but I had to blog about something. It's been far too long. And I successfully seared something. I was really proud. Because the searing didn't cook the fish all the way, just created this brown crust on the bottom. Then the baking finished cooking it through. It was so nice and flaky.
Anyways, happy Bastille Day. Made some croque-monsieurs for myself to celebrate this national French holiday.
OH. Also, last Saturday, I went to Blue Dahlia Bistro on 11st street (eastside in the historic French district) here in Austin, TX. Absolutely delicious. I ordered a prosciutto, mozzarella, pesto tartine. MMmmm. It was divine. Brought friends there too. One ordered a ham and cheese (super lame) and the other ordered smoke salmon (garnished with dill) and didn't eat it because he thought it was raw and got scared (super, super lame). But I ate it and it was so good. Salmon is just so flavorful. Not well-versed in the fish arena so it's nothing big when I say that salmon's probably my favorite.
Au Revoir!
This was actually the first time I had orzo. I really liked it as a much easier to cook version of rice. Much lower maintenance. I just mixed the orzo with olive oil, some rosemary, some Parmesan and some Gruyere (my favorite cheese!). It was pretty mild compared to the strong flavors I cooked with the fish but it was a nice compliment.
Anyways, nothing too fancy but I had to blog about something. It's been far too long. And I successfully seared something. I was really proud. Because the searing didn't cook the fish all the way, just created this brown crust on the bottom. Then the baking finished cooking it through. It was so nice and flaky.
Anyways, happy Bastille Day. Made some croque-monsieurs for myself to celebrate this national French holiday.
OH. Also, last Saturday, I went to Blue Dahlia Bistro on 11st street (eastside in the historic French district) here in Austin, TX. Absolutely delicious. I ordered a prosciutto, mozzarella, pesto tartine. MMmmm. It was divine. Brought friends there too. One ordered a ham and cheese (super lame) and the other ordered smoke salmon (garnished with dill) and didn't eat it because he thought it was raw and got scared (super, super lame). But I ate it and it was so good. Salmon is just so flavorful. Not well-versed in the fish arena so it's nothing big when I say that salmon's probably my favorite.
Au Revoir!
Friday, May 15, 2009
Spicy Jalapeño Omelette
This is a super simple meal. I mean, it's an omelette. How hard is that? It's not super complicated, but every now and then, I like making them just to try out different ingredient pairings and stuff. They're so good for experimentation. And they're also good for getting rid of ingredients that you need to use up. So ya, that's why I make omelettes all the time. It's never the same exact experience twice, it seems... for me at least. Here's my Spicy Jalapeño Omelette. I feel silly making a recipe thing just cause it's so easy but whatev. So easy in fact that I can't really explain what I did or give exact measurements. Also, this was the omelette I decided I would just go all out with in terms of spiciness.
Ingredients (serves 1)

Ingredients (serves 1)
- 3 eggs
- 2 scallions, chopped
- 1/2 jalepeño pepper
- habanero cheddar
- a few dashes of ground cayenne pepper
- a little bit of olive oil
- salt + pepper for seasoning
- Turn your stove to medium heat. Take your small skillet and pour in enough olive oil to coat the bottom of the pan. I don't like giving exact measurements for this stuff -- I'm sure you guys know how much oil you need to do this.
- When it gets hot enough, throw your scallions in and let them sauté for about 5 minutes. I know scallions are mild enough as it is, but I used a fair amount so I wanted to cook them way down to sweeten them a little. If you like the pungent taste of scallions, just throw in 1 chopped scallion near the very end instead. Anyways, when they're done sautéing, add in a little more olive oil so that the eggs won't stick to the pan when you throw them in there.
- Beat your 3 eggs in a separate bowl. Season them with salt and pepper and then pour them into your pan. Turn the heat down to low.
- Dice up half your jalapeño. I used half only because I included the membranes and the seeds, the parts of the pepper which have the most heat. If you don't want the seeds, use the entire pepper instead for a mild spiciness. Or if you want a lot of heat, use it all up, seeds and all! Throw them into the pan as well, and kind of spread them out over the egg.
- Grate some habanero cheddar onto your eggs. Just grate however much you want depending on the level of spiciness you want.
- Then, I don't know how people make omelettes, but I just kind of wait until most of the bottom layer of the eggs is cooked and its hard enough that I can fold it in half and flip it over to close the edges. That's why I do this on low, so that the egg doesn't burn on the bottom but the rest of it gets cooked as well. So ya, that's what I did. Make your omelette however you usually do!
- Then when that's all done, transfer your omelette onto a plate and grate some more habanero cheddar onto the top.
- Sprinkle some ground cayenne pepper onto your omelette. Why would we want to do this: 1) more heat!! and 2) to add some nice color. Add however much you feel you can handle.
- I served this over toast and butter, which served as a sort of neutralizer to the spiciness of the omelette.
Thursday, May 14, 2009
Lentil Salad with Lemon Vinaigrette
This recipe is so easy. Here it is.

- 1 lb lentils
- salt
- 1 1/2 cup of red grapes, cut in half
- 1 1/2 cup of green grapes, cut in half
- 1 red bell pepper, seeded and diced
- 2 scallions, chopped
- zest of 2 lemons
- goat cheese (optional)
- your favorite nuts, toasted
- juice of 2 lemons
- 1/3 cup of Extra Virgin Olive Oil
- 1/2 tsp of salt
- 1/4 tsp of fresh ground pepper
- Bring a pot of water to a boil (about 8 cups for 1 lb of lentils). Add salt for flavor.
- Clean your lentils by putting them in a strainer and running water through it just to make sure there's not dirt. Run your finger through them to make sure no other foreign objects are in there. When that's done, stick your lentils into your pot of boiling water for about 18 minutes.
- Cut your green and red grapes right in half and stick them in a large bowl.
- Clean and dice up your red pepper. We want to use red because they're sweeter than green. To clean out the bell peppers, you just cut the stem off, cut the pepper right in half and you can just scoop out all the membranes and seeds and throw them in the trash. I do it a different way but I can't quite explain it in words... and it all gets you to the same place anyways. Yup, then dice them and stick them into the bowl.
- Chop up 2 things of scallions and throw them in as well.
- Zest two lemons right over the bowl. When you're done, give it all a good mix just so you don't get huge clumps of zest in your salad.
- Now to make the vinaigrette. Squeeze the juice of two lemons into another bowl.
- Now, while you whisk, slowly pour in your E.V.O.O. so that it incorporates nicely with the lemon. We want extra virgin because it's fruitier. And fruity is good for this salad.
- Now pour in your salt and pepper. Stir and you're done!
- When your lentils are finished, strain them and lay them out on a wide plate, letting them cool down for 5 or so minutes. Use more than one plate if you need to (more surface area = they cool down faster. Makes sense).
- Then put the lentils in your bowl with the lemon vinaigrette. Make sure you toss it very well so that everything's all nice and mixed in.
- Then you're ready to serve. I just put a dallop of goat cheese to add a little creaminess and tartness. To keep this vegetarian (vegan even!), totally just omit this step.
- For texture, which I unfortunately didn't do, you would add your favorite nuts on top. This salad is very soft, very mushy naturally. The crunchiest things in it are your grapes and bell pepper chunks so just to add a little more protein and a lot more crunch, I highly recommend adding nuts. Toast them in the oven for a few minutes to bring out flavor if you want. Then you would sprinkle liberally over the top of your lentil salad and there you have it. This takes 25 or so minutes - tops and it's very nice and citrusy, which I like.
Monday, May 11, 2009
Massive Update: Salmon, Cookies, Spider, and Chile Rellenos!
Oh god, these last few weeks have been busy. Just haven't had the time to update what with school and all.
This is what has happened since:
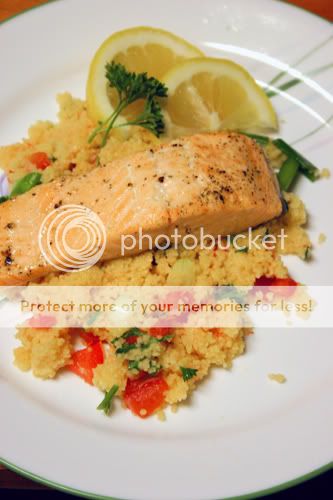
This is a sear-roasted lemon butter salmon fillet served over couscous. First time attempting to "sear" something. I didn't get that brown crust I wanted, unfortunately. And this isn't really a fillet-sized serving, but meh. I seasoned it with salt and pepper, stuck pieces of butter on top, wrapped them in aluminum foil and put them in the oven for about 20 minutes. Afterwards, I squeezed some fresh lemon onto them. And it was my first time cooking couscous, which is absolutely delicious. Couscous looks like rice but it's actually a pasta. I stove-cooked it in a chicken broth butter mixture for 5 minutes, then tossed in diced tomatoes, chopped parsley, chopped scallions, and finely grated smoked cheddar. Put a lid on it, let it sit, and served it under the fillet.
 Chocolate Chip Cookies. This was actually kind of an "original" recipe. Rachel and I took the recipe for the dough and deviated significantly. We added nutella to the dough, added some milk. We sprinkled dark chocolate bits onto the top along with sliced almonds (which toasted nicely in the oven) and there it is! Chocolate cookies. They disappeared so fast.
Now, today!
 Oh man, I was just watching TLC (Jon and Kate + Eight, I think) and this guy started crawling in front of the television. He startled me! Look at those eyes. Cute, yes?
 But I'm terrified of brown recluses so I got my more brave roommate to kill it for me with Raid. Fortunately, it wasn't a brown recluse. Unfortunately, we may have killed it despite the fact that after spraying, we decided to catch it and set it back outside.
And for my chile rellenos!! My blog will never be a food blog without posting the recipes that I use but food blogging is not my aim. I'm a photo blog. I just happen to be cooking a lot. Anyways, for this, I took a lot of pictures throughout so I might as well do the recipe thing. These took me forever to make. It's a long process. But it was good.
Chile Rellenos with Tomato-Avocado Salsa
For the chile rellenos:
1) You need to take your peppers and roast them in the oven. It doesn't matter if they're poblanos or anaheims. I used poblanos but I don't know the difference between the two yet, in terms of taste. They just need not be bell peppers. So how to roast? Take a baking pan, put some aluminum foil on them. Put your peppers on them, giving them room. Drizzle olive oil onto them so that they retain their moisture (if you have a brush, even better! Brush 'em down!). Stick them in the oven at 350 degrees for 40 minutes to an hour. Check them periodically throughout. When they start blackening on the tops, rotate them using the stem.
2) While your peppers are roasting, let's make a sauce to eat it with. How about a tomato-avocado salsa? Ok good. So you take 4 tomatoes, dice them, and put them in a large bowl. I used Roma.
3) Next, take 2 Haas avocados, dice those and stick them in the bowl. In case you don't know, you take a knife and start cutting down the middle of the avocado until you hit the pit. Then just start making your way around the seed with the knife. Once all the way around, just take the two halves and twist. They will split easily. Then take the sharp side of your knife and stick it into the seed and just pull out. Take each half of the avocado, using your knife to make vertical and horizontal lines in the fruit. Take a spoon, scoop them out and put them into your bowl with the tomatoes.
4) Take half of a medium red onion and finely chop it! Stick those into the bowl.
5) Squeeze the juice of 1 or two limes into the bowl as well.
6) Put into the mixture 2 tbs of vegetable oil.
7) Put in 2 tbs of honey (mmmm). The original recipe called for 2 tsps but I misread it and put in 2 tbs. It turned out to be a very sweet salsa. Which I liked very much.
8) Now, this is a salsa right? So it MUST have cilantro? Well, I don't like cilantro so I skipped this step. But if you want, put in 3 tbs of cilantro.
9) Season with salt and pepper to taste.
10) Combine all of them gently until the oils and juices and chopped everythings are all incorporated, making sure not to crush the avocado cubes or tomatoes.
 Here's what it looks like. It's really nice and sweet and everything mixes very well. It's a little green because the avocado kinda dissolves into the oils. No big. Stick your salsa in the fridge for later. Anyways, once your peppers are done roasting, they should look like this:
 Those are what they look like afterwards.
11) Stick them in a large bowl and cover the bowl with saran wrap. Let it sit there for about 20 minutes. Allowing them to steam like this loosens the skins so that twenty minutes later it just comes right off. Then you just peel them.
12) Okay, go over to your cutting board. Take a knife and cut a little pocket halfway down the peppers, being very careful not to tear other parts of the flesh. You want to take a spoon and scoop out all the inner white membranes and seeds. Discard those nasties.
13) Take your cheese and cut them into rectangular prism things the size of your peppers. I used Habanero Cheddar but it's really up to you.
14) Okay now to make the batter. Take 3 eggs (approx 1 egg for every 2 peppers if you want to know the ratio if you're making more) and pour only the whites into a mixing bowl.

This is the hard part... unless you have a blender, mixer, whatever. We need these egg whites whipped so that the batter will be light and fluffy. Since I didn't have any machine to do this, I had to hand-whip it with my trusty whisk! 15 minutes later and a right arm terribly sore, I've whipped those bad boys:
 Do it until it's pretty much solid.
15) Take your egg yolks and fold them into the whipped egg whites. Add some salt if you like!
16) Take some vegetable oil in a large stew pot and heat it up real nice on the stove
17) Take some flour in a little bowl thing. You want to take your stuffed peppers, coat them lightly in flour. Make sure it's all covered up. You need it all nice and floured so that the batter you made with the egg whites will stick to your pepper. So after you run it through the flour, stick it in the batter, and then stick it into your hot oil and watch them sizzle and fry!
 Just take them out when they're nice and brown. It takes just a couple minutes on each side.
18) Stick them onto a plate with paper towels so that they will soak up the excess oil.
19) When you're done. Stick it on a plate, and pour some of that salsa over it!
 Presentation's not the best, but it tasted wonderful so it doesn't matter. I don't even like tomatoes but they were good in the salsa.
There's that. I know this isn't the authentically Mexican way to prepare this, but this is just my variation on the chile relleno.
Until next time!
This is what has happened since:
- Wrote 3 papers
- Took 2 tests
- Finished my photo story on Barsana Dham. Pictures of that soon, I hope? Maybe.
This is a sear-roasted lemon butter salmon fillet served over couscous. First time attempting to "sear" something. I didn't get that brown crust I wanted, unfortunately. And this isn't really a fillet-sized serving, but meh. I seasoned it with salt and pepper, stuck pieces of butter on top, wrapped them in aluminum foil and put them in the oven for about 20 minutes. Afterwards, I squeezed some fresh lemon onto them. And it was my first time cooking couscous, which is absolutely delicious. Couscous looks like rice but it's actually a pasta. I stove-cooked it in a chicken broth butter mixture for 5 minutes, then tossed in diced tomatoes, chopped parsley, chopped scallions, and finely grated smoked cheddar. Put a lid on it, let it sit, and served it under the fillet.
Chocolate Chip Cookies. This was actually kind of an "original" recipe. Rachel and I took the recipe for the dough and deviated significantly. We added nutella to the dough, added some milk. We sprinkled dark chocolate bits onto the top along with sliced almonds (which toasted nicely in the oven) and there it is! Chocolate cookies. They disappeared so fast.Now, today!
Oh man, I was just watching TLC (Jon and Kate + Eight, I think) and this guy started crawling in front of the television. He startled me! Look at those eyes. Cute, yes?But I'm terrified of brown recluses so I got my more brave roommate to kill it for me with Raid. Fortunately, it wasn't a brown recluse. Unfortunately, we may have killed it despite the fact that after spraying, we decided to catch it and set it back outside.And for my chile rellenos!! My blog will never be a food blog without posting the recipes that I use but food blogging is not my aim. I'm a photo blog. I just happen to be cooking a lot. Anyways, for this, I took a lot of pictures throughout so I might as well do the recipe thing. These took me forever to make. It's a long process. But it was good.
Chile Rellenos with Tomato-Avocado Salsa
For the chile rellenos:
- 4 poblano peppers
- olive oil
- a nice big block of your favorite cheese.
- 3 eggs
- a pinch of salt
- about 2 or 3 cups of vegetable oil
- 4 roma tomatoes, diced
- 2 haas avocados, diced
- 1/2 medium red onion, finely chopped
- juice of 1 (or 2) limes
- 2 tbs vegetable oil
- 2 tbs honey
- 3 tbs cilantro
- salt and pepper
1) You need to take your peppers and roast them in the oven. It doesn't matter if they're poblanos or anaheims. I used poblanos but I don't know the difference between the two yet, in terms of taste. They just need not be bell peppers. So how to roast? Take a baking pan, put some aluminum foil on them. Put your peppers on them, giving them room. Drizzle olive oil onto them so that they retain their moisture (if you have a brush, even better! Brush 'em down!). Stick them in the oven at 350 degrees for 40 minutes to an hour. Check them periodically throughout. When they start blackening on the tops, rotate them using the stem.
2) While your peppers are roasting, let's make a sauce to eat it with. How about a tomato-avocado salsa? Ok good. So you take 4 tomatoes, dice them, and put them in a large bowl. I used Roma.
3) Next, take 2 Haas avocados, dice those and stick them in the bowl. In case you don't know, you take a knife and start cutting down the middle of the avocado until you hit the pit. Then just start making your way around the seed with the knife. Once all the way around, just take the two halves and twist. They will split easily. Then take the sharp side of your knife and stick it into the seed and just pull out. Take each half of the avocado, using your knife to make vertical and horizontal lines in the fruit. Take a spoon, scoop them out and put them into your bowl with the tomatoes.
4) Take half of a medium red onion and finely chop it! Stick those into the bowl.
5) Squeeze the juice of 1 or two limes into the bowl as well.
6) Put into the mixture 2 tbs of vegetable oil.
7) Put in 2 tbs of honey (mmmm). The original recipe called for 2 tsps but I misread it and put in 2 tbs. It turned out to be a very sweet salsa. Which I liked very much.
8) Now, this is a salsa right? So it MUST have cilantro? Well, I don't like cilantro so I skipped this step. But if you want, put in 3 tbs of cilantro.
9) Season with salt and pepper to taste.
10) Combine all of them gently until the oils and juices and chopped everythings are all incorporated, making sure not to crush the avocado cubes or tomatoes.
Here's what it looks like. It's really nice and sweet and everything mixes very well. It's a little green because the avocado kinda dissolves into the oils. No big. Stick your salsa in the fridge for later. Anyways, once your peppers are done roasting, they should look like this:Those are what they look like afterwards.11) Stick them in a large bowl and cover the bowl with saran wrap. Let it sit there for about 20 minutes. Allowing them to steam like this loosens the skins so that twenty minutes later it just comes right off. Then you just peel them.
12) Okay, go over to your cutting board. Take a knife and cut a little pocket halfway down the peppers, being very careful not to tear other parts of the flesh. You want to take a spoon and scoop out all the inner white membranes and seeds. Discard those nasties.
13) Take your cheese and cut them into rectangular prism things the size of your peppers. I used Habanero Cheddar but it's really up to you.
14) Okay now to make the batter. Take 3 eggs (approx 1 egg for every 2 peppers if you want to know the ratio if you're making more) and pour only the whites into a mixing bowl.
This is the hard part... unless you have a blender, mixer, whatever. We need these egg whites whipped so that the batter will be light and fluffy. Since I didn't have any machine to do this, I had to hand-whip it with my trusty whisk! 15 minutes later and a right arm terribly sore, I've whipped those bad boys:
Do it until it's pretty much solid.15) Take your egg yolks and fold them into the whipped egg whites. Add some salt if you like!
16) Take some vegetable oil in a large stew pot and heat it up real nice on the stove
17) Take some flour in a little bowl thing. You want to take your stuffed peppers, coat them lightly in flour. Make sure it's all covered up. You need it all nice and floured so that the batter you made with the egg whites will stick to your pepper. So after you run it through the flour, stick it in the batter, and then stick it into your hot oil and watch them sizzle and fry!
Just take them out when they're nice and brown. It takes just a couple minutes on each side.18) Stick them onto a plate with paper towels so that they will soak up the excess oil.
19) When you're done. Stick it on a plate, and pour some of that salsa over it!
Presentation's not the best, but it tasted wonderful so it doesn't matter. I don't even like tomatoes but they were good in the salsa.There's that. I know this isn't the authentically Mexican way to prepare this, but this is just my variation on the chile relleno.
Until next time!
Monday, April 20, 2009
Vareniki
VARENIKI
Ukrainian
Eh, it was okay. I don't know what I did wrong...
Ukrainian

Eh, it was okay. I don't know what I did wrong...
Sunday, April 19, 2009
Raggmunk
Quickly -- my Swedish Potato Pancakes with Bacon and Lingonberry Jam:
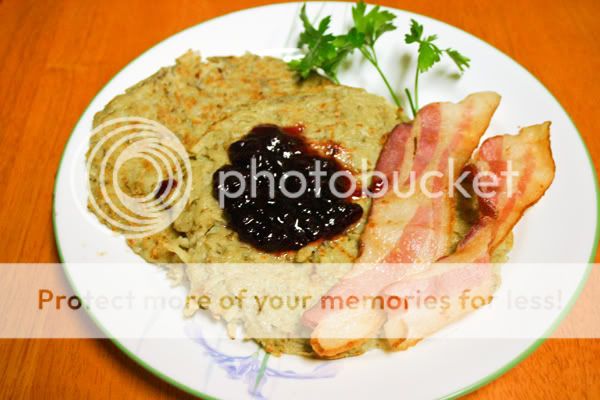
I don't know what potato pancakes are supposed to look like but upon googling it, I think mine looks fairly good in relation. I'm gonna go do some research and find out what they should really look like at a restaurant when I have the time. Doesn't look too appetizing from the picture, I know. But it wasn't bad. I loved the tartness of the lingonberry jam. The pancakes themselves were very dense though. So full afterwards. Maybe a little wet? I squeezed the grated potatoes as much as I could given the fact that I was rushing for work.
And yes, my bacon looks yellow because I like to overcook my bacon (because I'm afraid of those brain tapeworms you get from undercooking pork).
That's all! Early morning tomorrow. Going to the temple. Maybe I'll put some pictures up from there. It's like a little patch of paradise, I kid you not.
Saturday, April 18, 2009
Croque-mariage
[The title's supposed to make sense when you see the second picture]
I prepared croques again today! But this time, I wanted to try just a regular croque-monsieur.
 Rachel made herself a croque-madame. We used different cheeses for our own respective Béchamel sauces and this time, I did not burn our sandwiches during the broil! I used Dijon mustard also to keep it closer to the original French way of preparing this sandwich but Rachel didn't like it (wah wah wah). I put a little too much on mine though. But it was so so delicious still. I just love the sauce on top with all the melted cheese and the crunchiness of the bread (croque translates to crunch in English).
 Et voilà (and there it is!) -- a croque-madame and a croque-monsieur... in a croque-mariage!
I prepared croques again today! But this time, I wanted to try just a regular croque-monsieur.
Rachel made herself a croque-madame. We used different cheeses for our own respective Béchamel sauces and this time, I did not burn our sandwiches during the broil! I used Dijon mustard also to keep it closer to the original French way of preparing this sandwich but Rachel didn't like it (wah wah wah). I put a little too much on mine though. But it was so so delicious still. I just love the sauce on top with all the melted cheese and the crunchiness of the bread (croque translates to crunch in English).Et voilà (and there it is!) -- a croque-madame and a croque-monsieur... in a croque-mariage!
Thursday, April 16, 2009
Matzah Ball Soup
Six days late, I made Matzah Ball Soup, a very kosher dish traditionally eaten at Passover. It was my first time making matzah balls but it turned out delicious. A little dense perhaps but still pretty good. I didn't have a chicken or anything so I just made a basic vegetable soup to go along with it. It was surprisingly very good. I don't typically prepare soups so this is definitely a first step.

So chunky and so healthy! Matzah balls, carrots, celery, zucchini, potato fingerlings, chopped onions cooked in chicken broth for 40 minutes garnished with chopped parsley and scallions!
Tuesday, April 14, 2009
Croque-madame
 Ya, I've been watching a lot of Food Network and I've got this bug to cook. I mean, most of the stuff I've been making is pretty simple. This one was a little more difficult, but it was worth every bit of the hard work. I originally set out to make a Croque-monsieur (French toasted ham and cheese sandwich) but since I burnt it during the broil, I decided to add a poached egg on top in hopes of perhaps covering up the burnt taste a little more. And voila! Croque-madame!
Next time, I'll be careful to not burn my sandwich when I go to broil. Also, I'm gonna put more ham in there. I mean, it was delicious and all but I could've put more ham in my sandwich. I was being a pansy (actually, I wanted the main taste to be the Béchamel sauce/Gruyère cheese). Does this look good? Yes, I'm sure it does. I'm definitely going to make another one of these in the future. I've got enough cheese to do another, I think. It's absolutely delicious. I can't stop thinking about it.
Subscribe to:
Posts (Atom)